Tie-Dye Mickey T-shirts
Tie-Dye is striking and adaptable, making it a great way to personalize shirts for your family! I have made several sets of Tie-Dye shirts featuring a central Mickey head with a spiral design surround. Here’s a sneak peak one of my finished projects:

MATERIAL LIST:
- 100% cotton white T-shirts for each family member
- one container of WAXED white dental floss (get unflavored)
- Soda Ash
- Sewing needle with eye large enough for the floss
- Cardboard
- Pencil
- Scissors
- Fabric dye or tie-dye kit in your desired colors
- A bucket or pail for soaking
- Plastic wrap
- Plastic grocery bags, at least two per shirt
- Good quality rubber bands (don’t use the ones from your tie-dye kit)
- rubber gloves
Draw out your Mickey Head on a piece of cardboard. I use a larger tracing for the adult shirts and a reduced size for the kid shirts. If you don’t feel confident in your free-hand abilities, find a nice Mickey Head image on your computer monitor (use a google image search), and then trace the picture with some lightweight paper right from the screen. Freezer paper works nicely for this if you don’t have tracing paper at home. Then cut out the head, and transfer the image to the cardboard. Cut out the cardboard head, which can be reused over and over.

Center your cardboard Mickey on the T-shirt, and then trace around it with a pencil. Make sure the lines are dark enough to see, they will not be visable after the process is complete.


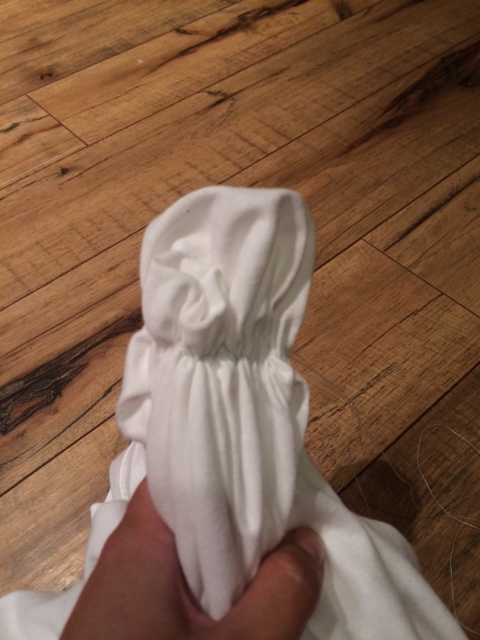
Cut a length of dental floss, a yard or so long. Thread it through your needle. Starting anywhere you wish on the Mickey head, sew around your pencil line using small running stitches. I do not knot the end, but rather leave a tail a foot or so long hanging out the end. After the head is all basted, you are going to pull the ends of the floss to gather all the stitches up. I typically do this as I go along sewing, every few inches, rather than at the end. You will want the gather to be relatively tight, but be careful not to break your floss.
Starting stitches:

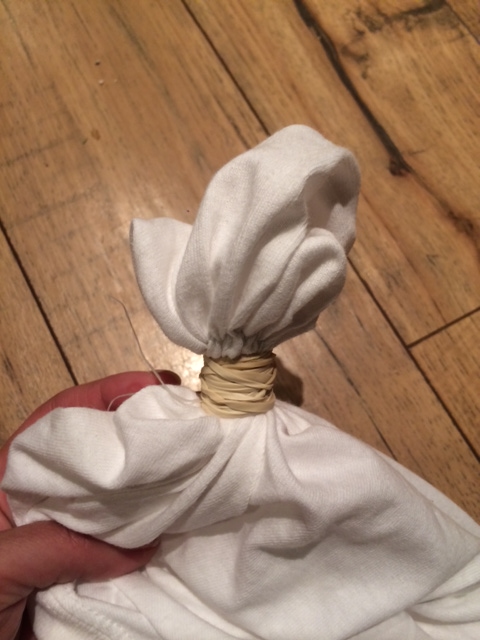
All gathered up:
Looks pretty funny right? Now, take your nice thick rubber bands and loop them tightly around the base of the Mickey Head, directly under your basting stitches. You should be close to the dental floss, but not covering it up. I usually use about 4 medium bands for an adult shirt, and 3 for a small one. Nice and tight, so no white is showing for about an inch thickness under Mickey.
If you are making multiple shirts, repeat the above steps until they are all ready. Now, you are going to soak the shirts in Soda Ash. Fill your bucket with water, enough to cover the shirts completely, adding soda ash– about 1 cup to a gallon of water should do the trick. I let my shirts soak for a couple of hours. If you are in a rush I don’t think they need to soak that long, but at least 20 min.
Squeeze out some of the excess water, you may want to don your gloves at this point because the water will be very basic and can irritate sensitive skin. Then, lay the shirt on a hard surface with the banded Mickey facing upwards and positioned in the center of the shirt.

Now, using the Mickey head as your center, twist the shirt in the direction you want your spiral to run, until the entire shirt is all squished up. Just tuck in those sleeves!

Use some thinner, longer rubber bands to hold the gathered disk together, but not too tight. I usually use 4 bands so I have nice divided sections to help guide my color placement. The mickey head will be sticking straight out of the center of your disk.

Now, mix up your colors according to the directions on the bottle. This part can be messy so protect your space! First, pick the color that you want to dye your Mickey head. Hold the disk upside-down and apply the color to the Mickey head starting about where your basting stitches are. Make sure all the white is covered but don’t use too much, so it doesn’t bleed onto the main part of the shirt. At this point, you can wrap the Mickey head separately with some plastic wrap to keep the color from bleeding, using a rubber band placed over your other bands. If you are using a color that will be on your shirt anyway I don’t think this step is necessary, but if you are using black for your head you may want to use this extra protection.

Now, depending on the number of colors you are using, dye the rest of the shirt in sections. If you are using two colors, separate them quadrants instead of halves for a tighter spiral. More than two, be creative! Just try and put colors next to each other than mix well. For example, if you are using orange, yellow, and blue try to place the yellow between the other two colors so the orange and blue do not mix. You may get a little green or light orange this way, but at least you will not have any mud puddles! Similarly red and green should not be next to each other. For this example shirt I am making a blue, yellow, and green spiral with a green Mickey Head.
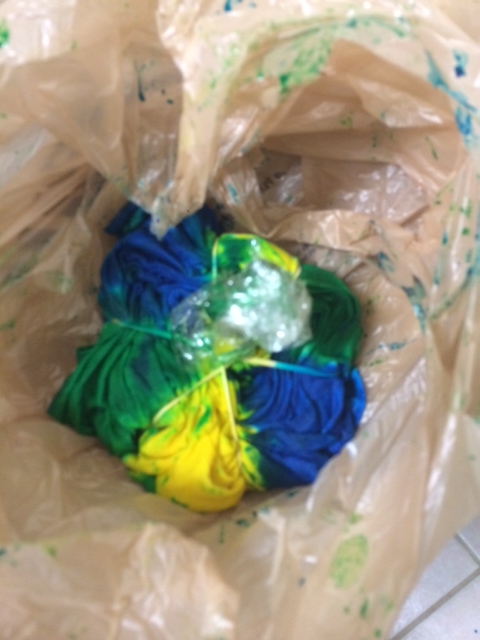
Now, place your wet, dripping shirt into a plastic bag and wrap it up, then double bag it. You are going to let this sit for at least several hours.
Here comes some magic! Take out your shirt over a sink of running cold water, and unwrap the bands holding the disk together, as you start rinsing out the excess dye. Rinse out the excess dye, then carefully clip off the bands that are separating your Mickey Head. Rinse, rinse, rinse!

Pull out your floss basting, or cut carefully if necessary. Squeeze out the excess water, and admire your wet but finished product!

You are going to want to machine wash on cold with a little detergent to get out the rest of the excess dye, all by itself so you don’t inadvertently dye your other clothes! I use a few old towels to protect my space, and throw those in with my new shirts.
Enjoy!
